Friday, December 26, 2014

Completion on a wonderful Christmas day!

Jan and I started first thing Wednesday morning on the Aqua-Hot.  I left you with the bay all cleaned up and ready for the tray to be installed.  Aqua-Hot changed how they mount the unit, the old one sat directly on the floor of the bay and was held in place by 2 angle cleats, whereas the new unit is mounted in a tray with an extended flange that requires you cut a 14" x18" hole in the floor that it sits down in.  We were definitely not too excited about cutting a huge hole in the floor of our motorhome.  Our mentor and Aqua-Hot expert, Rudy Legett, instructed me to get a chisel and hammer and knock off the flange so the tray would sit flat on the floor, and as the existing intake and exhaust holes are the same, everything would line up, so that's what we did.  It was easy to get it off, put in the tray and fasten it down with 6 #10 screws.
The tray with the flange removed

The tray in place
I wanted to get as much done to the new unit as I could before slipping it into position as there is not a lot of room around it when in place.  So I threaded in the brass connectors that gave me such a fit to find.
Our "Christmas present" sitting on the workbench, er, picnic table

The famous fittings

All installed!
Of course we really took our time, and tried to evaluate how all the hoses and wires would connect so I tried to get the angles on the installed fittings pointed exactly where we needed them.  We mounted the new expansion tank for the antifreeze.  This new system works on zero pressure, which sounds great to me, less chance of any leaking, but the expansion tank needs to be fairly close and it requires a 5/8" hose to connect to the unit, to be sure the antifreeze moves back and forth freely with heating and cooling.  We ended up mounting it in the adjacent bay.
New expansion tank mounted and new hose ready to be connected
The new unit uses a much superior rigid air intake tube, but it's a bit larger than the old intake so we did need to do a little modification on the floor to enlarge the intake hole.
After "surgery", the square hole is the intake with the round exhaust hole behind
Then with the help of our friend Pat, we slid it into place, and the connections began.  Remember there are 3 outputs for heat, 3 returns for heat, 2 engine loop connections, 2 diesel fuel connections, a 120 volt AC wire, and the inlet and outlet for domestic hot water, and all but the 3 outputs for heat are in different locations, so we went slow and careful to try to make it neat and accessible for the future.
Some of the connections, you can see it's tight in there
I had attached the wire for the electric element to the unit before slipping it in, and had remounted a junction box on the ceiling of the bay so that was easy to connect.  We struggled a bit with a couple of the connections, but in the end we got them all connected, double and triple checked all the hose clamps until we were confident there would be no leaks.  Next, time to mix the antifreeze and pump in 16 gallons!  We used a 5 gallon pail, and a small drill pump and pumped the antifreeze in the drain hose until we saw it moving out the clear hose to the expansion tank, then we purged the system of air by running each circulation pump to clear each of the 3 heating loops, and the engine preheat loop.  After burping the unit we added a bit more antifreeze, and made sure the expansion tank was filled to the "cold" line.
Our mix station

Getting ready to pump in the antifreeze
We even had an audience!
Next we had to tackle the new exhaust pipe.  As I said we had a brand new one fabricated, and decided to wrap it in insulation to further safeguard the coach from the heat.  We carefully wrapped the entire pipe, secured it, and then Jan singlehandedly crawled under, and inserted the exhaust elbow into the new unit, attached the pipe to it, and then hung the new pipe, and capped it off by attaching the chrome tip!  She saved my butt yet again!
All wrapped

Jan attaching the elbow

The pipe coming out of the Aqua-Hot

All in place!
Next the brains of the unit needed to hooked up.  We never cared for the way the original circuit board and control panel were mounted, so we decided to mount it on the surface of the bay door, a much more convenient spot.  There are about 30 wires or so from the coach to the circuit board, thermostat, zone fans, etc, and then likewise another 30 or so wires that go from the circuit board to the unit.  Those are easy as they are all prewired from the factory, but the coach wires needed to all be carefully connected one by one to the new circuit board.
Changing over the wires one by one

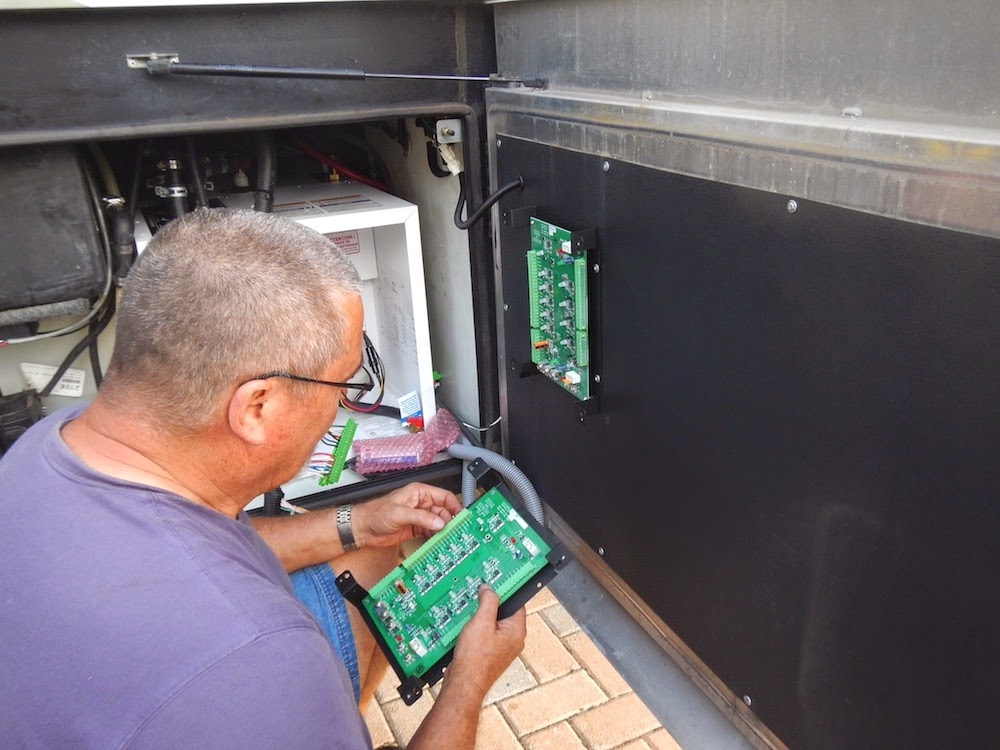
Confirming the settings on the old match the new one on the door

The finished circuit board and control panel
Getting closer now with just a couple more things to do.  The last connections that had to be made were the domestic hot water lines.  They were fairly easy as we used "Sharkbite" fittings that only require you to push the pipe into the fitting to connect, no hose clamps necessary.
Making the water connections

Complete!  Fittings are on the right
So the only thing left was to bleed the diesel lines, and FIRE IT UP!  And it did with no leaks, and it works great, cycled it several times on diesel and also made sure the electric element worked, as well as all the heating zones and the engine preheat loop.  So Merry Christmas to us!

As if that wasn't enough on the big day, we went over to Ray and April's for Christmas dinner with a sensational rib roast that Ray knocked out of the park, all the trimmings and even pies for dessert, and we were also very excited that Mark and Ginger were there to join in the festivities.  We hadn't seem them in ages and it was super to catch up.  So what a day, and year, a lot to be thankful for.

No comments: